การตั้งค่า BIOS
คำาเตือน: ตำาแหน่งที่แท้จริงของพอร์ต LAN
แตกต่างกันในแต่ละรุ่น ดูบทก่อนหน้า เพื่อค้นหาพอร์ต LAN
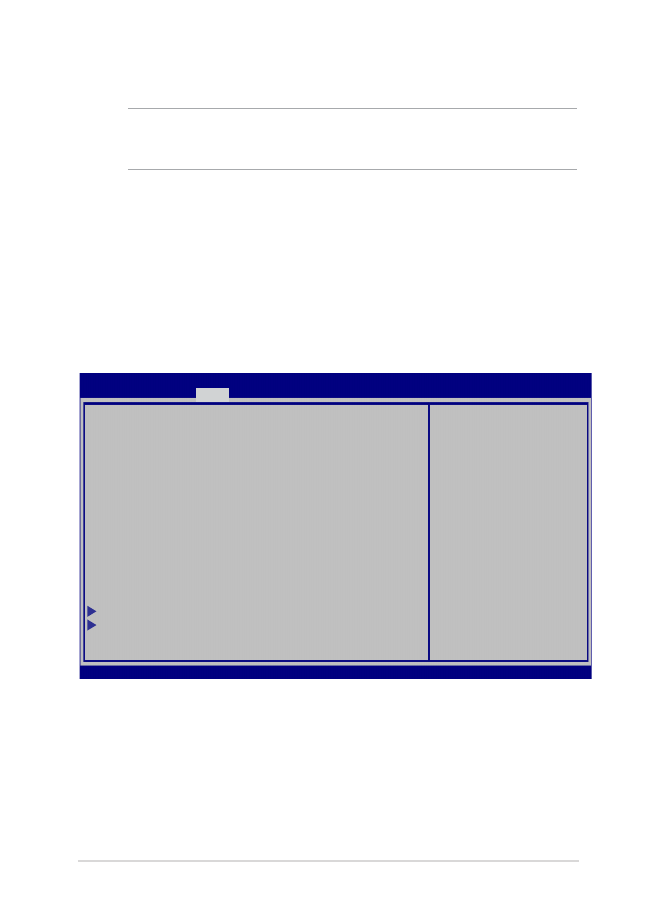
บูต
เมนูนี้อนุญาตให้คุณตั้งค่าลำาดับความสำาคัญของตัวเลือกการบูต
คุณสามารถอ้างถึงกระบวนการต่อไปนี้
ในขณะที่ตั้งค่าลำาดับความสำาคัญของการบูตของคุณ
70
โน้ตบุ๊ค PC คู่มืออิเล็กทรอนิกส์
→←
: Select Screen
↑↓
: Select Item
Enter: Select
+/— : Change Opt.
F1 : General Help
F9 : Optimized Defaults
F10 : Save & Exit
ESC : Exit
Sets the system
boot order
Aptio Setup Utility - Copyright (C) 2012 American Megatrends, Inc.
Main Advanced
Boot
Security Save & Exit
Version 2.15.1226. Copyright (C) 2012 American Megatrends, Inc.
Boot Configuration
Fast Boot [Enabled]
Launch CSM [Disabled]
Driver Option Priorities
Boot Option Priorities
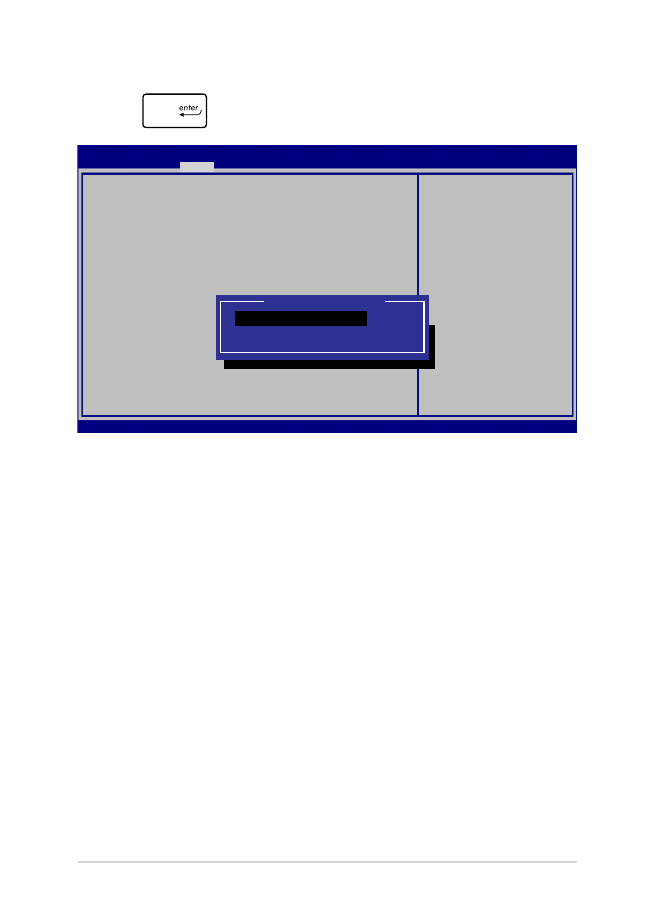
Boot Option #1 [Windows Boot Manager]
Add New Boot Option
Delete Boot Option
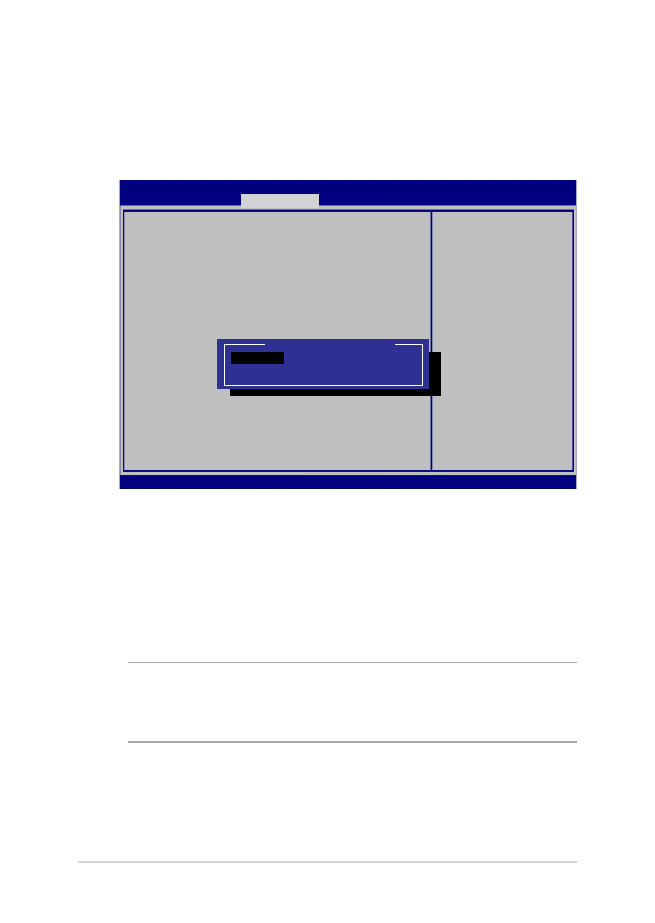
Boot Option #1
Windows Boot Manager
Disabled
2.
กด
และเลือกอุปกรณ์เป็น
Boot Option #1 (ตัวเลือกการบูต #1)

โน้ตบุ๊ค PC คู่มืออิเล็กทรอนิกส์
71
Password Description
If ONLY the Administrator’s password is set,
then this only limits access to Setup and is
only asked for when entering Setup. If ONLY
the user’s password is set, then this is a
power on password and must be entered to boot
or enter Setup. In Setup, the User will have
Administrator rights.
Administrator Password Status NOT INSTALLED
User Password Status NOT INSTALLED
Administrator Password
User Password
HDD Password Status : NOT INSTALLED
Set Master Password
Set User Password
I/O Interface Security
System Mode state User
Secure Boot state Enabled
Secure Boot Control [Enabled]
Key Management
Set Administrator
Password. The
password length
must be in the
following range:
Minimum length 3
Maximum length 20
Aptio Setup Utility - Copyright (C) 2012 American Megatrends, Inc.
Main Advanced Boot
Security
Save & Exit
→←
: Select Screen
↑↓
: Select Item
Enter: Select
+/— : Change Opt.
F1 : General Help
F9 : Optimized Defaults
F10 : Save & Exit
ESC : Exit
Version 2.15.1226. Copyright (C) 2012 American Megatrends, Inc.
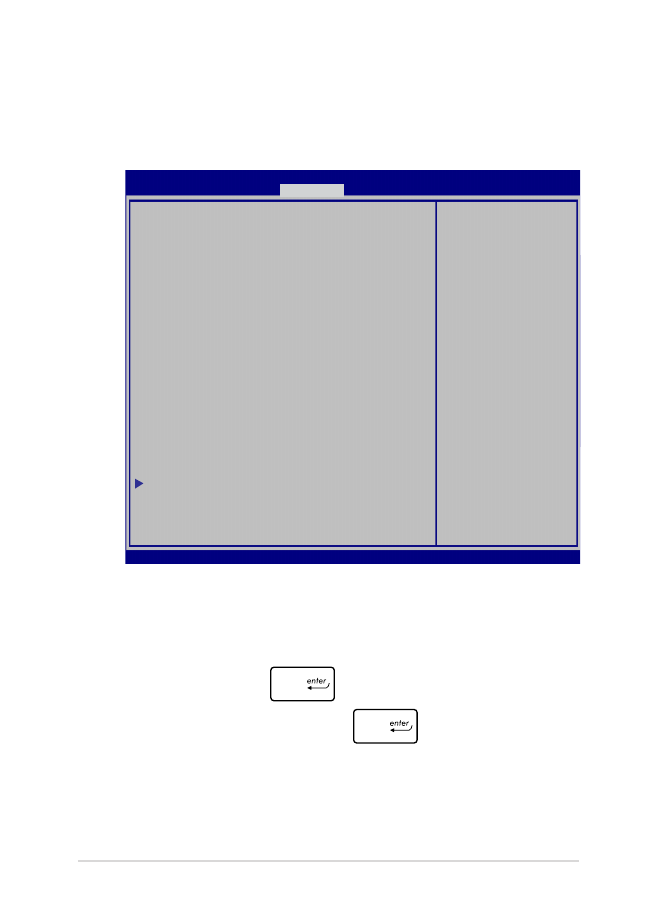
ความปลอดภัย
เมนูนี้อนุญาตให้คุณตั้งค่ารหัสผ่านผู้ดูแลระบบ และรหัสผ่านผู้ใช้ของโน้ตบุ๊ต PC ของคุณ นอกจากนี้
ยังอนุญาตให้คุณควบคุมการเข้าถึงไปยังฮาร์ดดิสก์ไดรฟ์, ระบบเชื่อมต่ออินพุต/เอาต์พุต (I/O)
และระบบเชื่อมต่อ USB ของโน้ตบุ๊ค PC ของคุณอีกด้วย
หมายเหตุ:
•
ถ้าคุณติดตั้ง
User Password (รหัสผ่านผู้ใช้),
คุณจะถูกขอให้ป้อนรหัสนี้ก่อนที่จะเข้าสู่ระบบปฏิบัติการของโน้ตบุ๊ค PC ของคุณ
•
ถ้าคุณติดตั้ง
Administrator Password (รหัสผ่านผู้ดูแลระบบ),
คุณจะถูกขอให้ป้อนรหัสนี้ก่อนที่จะเข้าสู่ BIOS
72
โน้ตบุ๊ค PC คู่มืออิเล็กทรอนิกส์
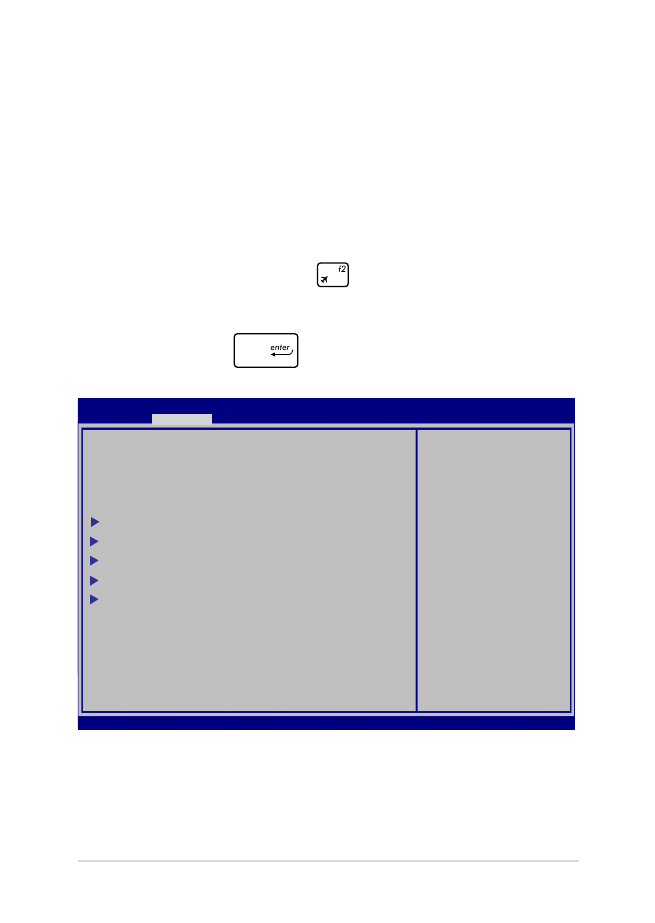
ในการตั้งค่ารหัสผ่าน:
1.
บนหน้าจอ
Security (ระบบป้องกัน), เลือก Setup Administrator Password (ตั้งรหัสผ่าน
ผู้ดูแลระบบ) หรือ User Password (รหัสผ่านผู้ใช้)
2.
เลือกแต่ละรายการ และกด
เพื่อเลือกอุปกรณ์
3.
พิมพ์รหัสผ่านอีกครั้ง และกด
ในการล้างรหัสผ่าน:
1.
บนหน้าจอ
Security (ระบบป้องกัน), เลือก Setup Administrator Password (ตั้งรหัสผ่าน
ผู้ดูแลระบบ) หรือ User Password (รหัสผ่านผู้ใช้)
2.
ป้อนรหัสผ่านปัจจุบัน และกด
3.
ปล่อยฟิลด์
Create New Password (สร้างรหัสผ่านใหม่) ให้ว่างไว้ และกด
4.
เลือก
Yes (ใช่) ในกล่องการยืนยัน จากนั้นกด
โน้ตบุ๊ค PC คู่มืออิเล็กทรอนิกส์
73
I/O Interface Security
LAN Network Interface [UnLock]
Wireless Network Interface [UnLock]
HD AUDIO Interface [UnLock]
USB Interface Security
If Locked, LAN
controller will
be disabled.
Aptio Setup Utility - Copyright (C) 2012 American Megatrends, Inc.
Security
→←
: Select Screen
↑↓
: Select Item
Enter: Select
+/— : Change Opt.
F1 : General Help
F9 : Optimized
Defaults
F10 : Save & Exit
ESC : Exit
Version 2.15.1226. Copyright (C) 2012 American Megatrends, Inc.
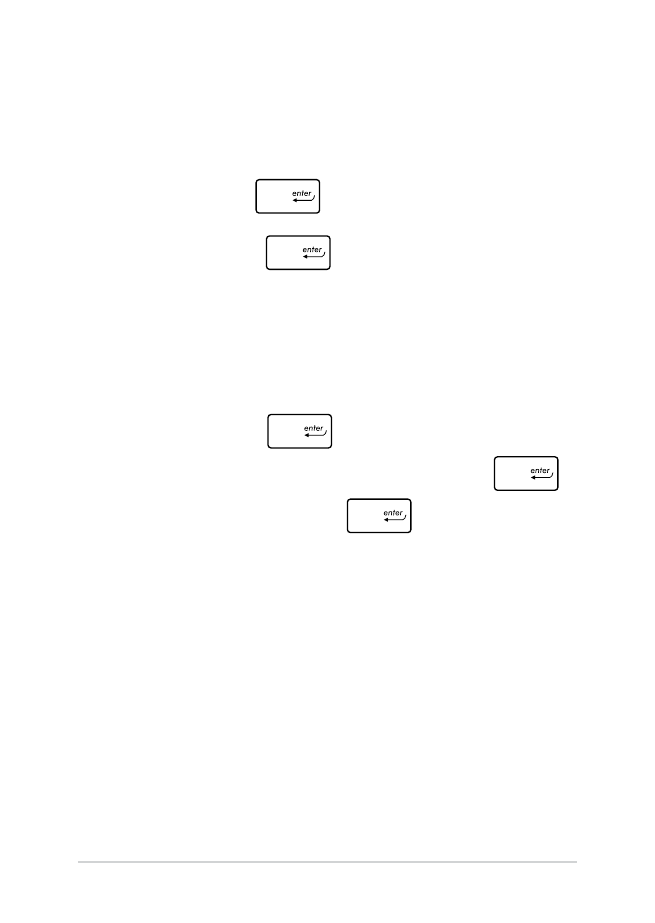
LAN Network Interface
Lock
UnLock
ระบบป้องกันอินเตอร์เฟซ I/O
ในเมนู Security (ระบบรักษาความปลอดภัย),
คุณสามารถเข้าถึงระบบรักษาความปลอดภัยระบบเชื่อมต่อ I/O เพื่อล็อคหรือปลดล็อคฟังก์ชั่
นระบบเชื่อมต่อบางอย่างของโน้ตบุ๊ค PC ของคุณได้
ในการล็อคอินเตอร์เฟซ I/O:
1.
บนหน้าจอ
Security (ระบบป้องกัน), เลือก I/O Interface Security (ระบบป้องกัน
อินเตอร์เฟซ I/O)
2.
เลือกอินเตอร์เฟซที่คุณต้องการล็อค และคลิก
3.
เลือก
Lock (ล็อค)
74
โน้ตบุ๊ค PC คู่มืออิเล็กทรอนิกส์
Version 2.15.1226. Copyright (C) 2012 American Megatrends, Inc.
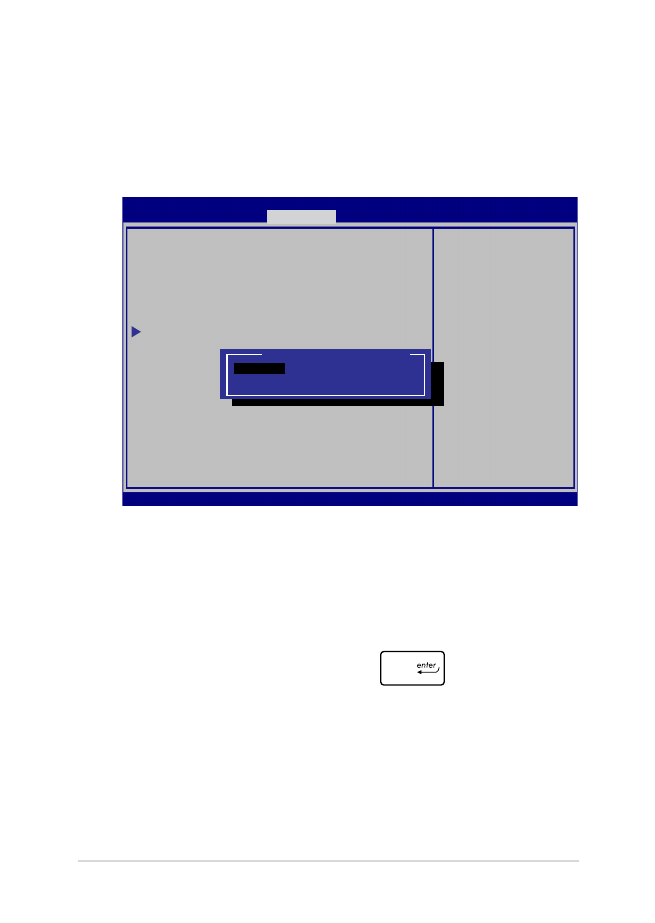
USB Interface Security
USB Interface [UnLock]
External Ports [UnLock]
CMOS Camera [UnLock]
Card Reader [UnLock]
If Locked, all
USB device will
be disabled
Aptio Setup Utility - Copyright (C) 2012 American Megatrends, Inc.
Security
→←
: Select Screen
↑↓
: Select Item
Enter: Select
+/— : Change Opt.
F1 : General Help
F9 : Optimized
Defaults
F10 : Save & Exit
ESC : Exit
USB Interface
Lock
UnLock
ระบบป้องกันอินเตอร์เฟซ USB
นอกจากนี้ คุณยังสามารถเข้าถึงระบบเชื่อมต่อ USB
เพื่อล็อคหรือปลดล็อคพอร์ต และอุปกรณ์ต่างๆ ผ่านเมนู
I/O Interface Security (ระบบรักษาความปลอดภัยระบบเชื่อมต่อ I/O) ได้ด้วย
หมายเหตุ: การตั้งค่า USB Interface (ระบบเชื่อมต่อ USB) เป็น
Lock (ล็อค) ยังล็อคและซ่อน พอร์ตภายนอก และอุปกรณ์อื่นๆ ที่มีภายใต้ USB Interface Security
(ระบบรักษาความปลอดภัยระบบเชื่อมต่อ USB)
ในการล็อคอินเตอร์เฟซ USB:
1.
บนหน้าจอ
Security (ระบบป้องกัน), เลือก I/O Interface Security (ระบบป้องกัน
อินเตอร์เฟซ I/O) > USB Interface Security (ระบบป้องกันอินเตอร์เฟซ USB)
2.
เลือกอินเตอร์เฟซที่คุณต้องการล็อค และคลิก
Lock (ล็อค)
โน้ตบุ๊ค PC คู่มืออิเล็กทรอนิกส์
75
Aptio Setup Utility - Copyright (C) 2011 American Megatrends, Inc.
Set HDD Master
Password.
***Advisable to
Power Cycle System
after Setting Hard
Disk Passwords***
Aptio Setup Utility - Copyright (C) 2012 American Megatrends, Inc.
Main Advanced Boot
Security
Save & Exit
→←
: Select Screen
↑↓
: Select Item
Enter: Select
+/— : Change Opt.
F1 : General Help
F9 : Optimized
Defaults
F10 : Save & Exit
ESC : Exit
Version 2.15.1226. Copyright (C) 2012 American Megatrends, Inc.
Password Description
If ONLY the Administrator’s password is
set,then this only limits access to Setup
and is only asked for when entering Setup.
If ONLY the user’s password is set, then
this is a power on password and must be
entered to boot or enter Setup. In Setup,
the User will have Administrator rights.
Administrator Password Status NOT INSTALLED
User Password Status NOT INSTALLED
Administrator Password
User Password
HDD Password Status : NOT INSTALLED
Set Master Password
Set User Password
I/O Interface Security
ตั้งรหัสผ่านหลัก
ในเมนู Security (ระบบรักษาความปลอดภัย), คุณสามารถใช้
Set Master Password (ตั้งรหัสผ่านหลัก) เพื่อตั้งค่ารหัสผ่านที่ใช้สำาหรับเปิดการเข้าถึงไปยัง
ฮาร์ดดิสก์ไดรฟ์ของคุณ
ในการตั้งรหัสผ่าน HDD:
1.
บนหน้าจอ
Security (ระบบป้องกัน), คลิก Set Master Password
(
ตั้งรหัสผ่านหลัก)
2.
พิมพ์รหัสผ่าน และกด
3.
พิมพ์รหัสผ่านอีกครั้งเพื่อยืนยัน และกด
4.
คลิก
Set User Password (ตั้งรหัสผ่านผู้ใช)้ และทำาขั้นตอนก่อนหน้านี้ซ้ำา เพื่อตั้งค่า
รหัสผ่านผู้ใช้ จากนั้นรหัสผ่านจะถูกตั้งค่า

76
โน้ตบุ๊ค PC คู่มืออิเล็กทรอนิกส์
Aptio Setup Utility - Copyright (C) 2012 American Megatrends, Inc.
Main Advanced Boot Security
Save & Exit
→←
: Select Screen
↑↓
: Select Item
Enter: Select
+/— : Change Opt.
F1 : General Help
F9 : Optimized Defaults
F10 : Save & Exit
ESC : Exit
Version 2.15.1226. Copyright (C) 2012 American Megatrends, Inc.
Save Changes and Exit
Discard Changes and Exit
Save Options
Save Changes
Discard Changes
Restore Defaults
Boot Override
Windows Boot Manager
Launch EFI Shell from filesystem device
Exit system setup
after saving the
changes.
บันทึก & ออก
ในการเก็บการตั้งค่าการกำาหนค่าต่างๆ ของคุณ, เลือก
Save Changes and Exit (บันทึกการ
เปลี่ยนแปลงและออก) ก่อนที่จะออกจาก BIOS
โน้ตบุ๊ค PC คู่มืออิเล็กทรอนิกส์
77
Aptio Setup Utility - Copyright (C) 2011 American Megatrends, Inc.
Start Easy Flash
Internal Pointing Device [Enabled]
Wake on Lid Open [Enabled]
Power Off Energy Saving [Enabled]
SATA Configuration
Graphics Configuration
Intel (R) Anti-Theft Technology Corporation
USB Configuration
Network Stack
Press Enter to run
the utility to
select and update
BIOS.
Aptio Setup Utility - Copyright (C) 2012 American Megatrends, Inc.
Main
Advanced
Boot Security Save & Exit
→←
: Select Screen
↑↓
: Select Item
Enter: Select
+/— : Change Opt.
F1 : General Help
F9 : Optimized Defaults
F10 : Save & Exit
ESC : Exit
Version 2.15.1226. Copyright (C) 2012 American Megatrends, Inc.
การอัปเดต BIOS
1.
ตรวจสอบรุ่นที่แน่นอนของโน้ตบุ๊ค PC จากนั้นดาวน์โหลดไฟล์ BIOS ล่าสุดสำาหรับรุ่นของคุณ
จากเว็บไซต์ ASUS
2.
บันทึกสำาเนาของไฟล์ BIOS
ที่ดาวน์โหลดมาไปยังแฟลชดิสก์ไดรฟ์
3.
เชื่อมต่อแฟลชดิสก์ไดรฟ์เข้ากับโน้ตบุ๊ค PC ของคุณ
4.
เริ่มโน้ตบุ๊ค PC ของคุณใหม่ จากนั้นกด
ระหว่างกระบวนการ POST
5.
จากโปรแกรมการตั้งค่า BIOS, คลิก
Advanced (ขั้นสูง) > Start Easy Flash (เริ่มแฟลช
แบบง่าย), จากนั้นกด

78
โน้ตบุ๊ค PC คู่มืออิเล็กทรอนิกส์
6.
ค้นหาไฟล์ BIOS ที่ดาวน์โหลดมาในแฟลชดิสก์ไดรฟ์
จากนั้นกด
7.
หลังจากกระบวนการอัปเดต BIOS, คลิก
Exit (ออก) > Restore Defaults (กู้คืนค่าเริ่มต้น)
เพื่อกู้คืนระบบกลับเป็น ค่าเริ่มต้น
FSO
FS1
FS2
FS3
FS4
0 EFI
<DIR>
ASUSTek Easy Flash Utility
[←→]: Switch [↑↓]: Choose [q]: Exit [Enter]: Enter/Execute
Current BIOS
Platform: G551
Version: 101
Build Date: Oct 26 2012
Build Time: 11:51:05
New BIOS
Platform: Unknown
Version: Unknown
Build Date: Unknown
Build Time: Unknown
FLASH TYPE:
MXIC 25L Series

โน้ตบุ๊ค PC คู่มืออิเล็กทรอนิกส์
79